data storage
Data storage introduction
test update !!!
Warning about /hy-tmp
- The
/hy-tmpdirectory is a directory for temporarily storing training data. After the instance is started, upload or download training data to this directory. - After the training data is over, if you need to save the training data or training results, upload the training data and training results to the personal data through the OSS command tool; after uploading to the personal data, delete the files in the
/hy-tmp/directory. legacy data. - After data training, if the personal data is not uploaded, the instance will be automatically cleared after 24 hours of shutdown. If the instance is leased by someone else after it is shut down, it cannot help you recover data.
- During the instance migration process, the
/hy-tmpdirectory will not be automatically migrated, and the data in the/hy-tmp/directory in the instance will be cleared. Before the migration, the/hy-tmp/The data in the directory is uploaded to the personal data space through the OSS command tool. - The
/hy-tmpdirectory is a shared directory for multiple instances on the same server. You can use thedf -hT | egrep 'Avail|hy-tmp'command to query after logging in to the instance using the space.
The platform provides the following data storage solutions, which can be selected according to your needs.
| Name | Directory | Type | Role | Permissions/Migrate with Instance | Unit Price | Shelf life |
|---|---|---|---|---|---|---|
| tmp | /hy-tmp | instance storage | training data | read-write/no | free | data will be deleted more than 24 hours after the instance is shut down |
| nas | /hy-nas | Remote storage | Private storage | Read/write/Yes | Every 0.0007 yuan/hour/G, 50G free during the promotion period | It will be deleted at 12:00 noon on the 15th day from the arrears |
| Personal Data | None | Cloud Disk | Private Storage | Read/Write/Yes | Every 0.0004 yuan/hour/G, 50G free during the promotion period | It will be deleted at 12:00 noon on the 15th day from the arrears |
| Public Dataset | /hy-public | Cloud Disk | Public Data | Read-Only/Yes | Permanently Free | Unlimited |
tip
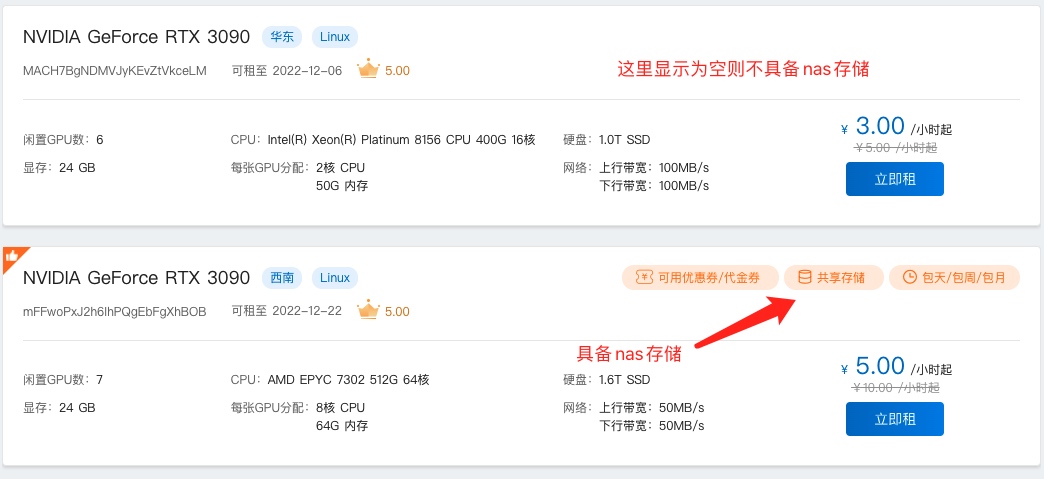
nas is a storage that is only available for a specific instance. If you want to use nas storage, select an instance with "shared storage" when creating an instance. The following figure shows the instances with and without nas storage.
Data storage suggestion
- Personal data: All data can be placed in the cloud disk of personal data, long-term storage, low cost, "cloud encrypted storage, safe reliable". 0.0004 yuan/hour per G, 50G free usage quota per user during the promotion period.
- nas: data that is frequently used recently, do not want to frequently download it to the local through personal data, you can save the data to
/hy-nasShared storage. 0.0007 yuan/hour per G, 50G free usage quota per user during the promotion period. - tmp: Temporary data for training, which requires the highest speed. It is recommended to put it in
/hy-tmp. free. - Public datasets: The public datasets are proposed by everyone in the Platform Forum After downloading the platform, it will be synchronized to the public data set for everyone to use. Free forever.
Data retention period
- After the pay-as-you-go shutdown or the monthly subscription expires, the instance will be automatically deleted after more than 10 days.
- After the pay-as-you-go shutdown or the monthly subscription expires, the
/hy-tmpdata in the instance will be deleted after more than 24 hours, but the platform provides a scheme for automatically uploading training data to avoid this problem, see Shut down after performing training and automatically uploading resultsUnderstand. - In the event of arrears, personal data and nas remote storage will be deleted at 12:00 noon on the 15th day after the arrears are counted
/hy-nasalso has custom images.
Data security and high availability
- Personal data: Gpushare Cloud's personal data cloud storage itself is very safe. Provide end-to-end security services. When accessing data, only the owner of the storage can access it, and an access account password is required to access the data. The data will be stored in multiple different AZs in the same area. When an AZ is unavailable, data can still be accessed from other AZs normally, which is suitable for data storage scenarios with high reliability requirements, and the availability reaches
99.99%. - nas remote storage: Gpushare Cloud's nas remote storage has high availability and durability, providing strong support for massive small files, low latency and high IOPS applications. The storage is mounted by default to the
/hy-nasdirectory with a "shared storage" instance, and only you have access to the data stored in the/hy-nasdirectory. - tmp: The disks used by Gpushare Cloud's tmp temporary storage are high-efficiency disks composed of disk array RAID on the server, with the fastest read and write efficiency.
How to upload local data to the instance
For uploading local data to the instance, we provide two methods, the OSS command tool and the FileZilla graphical transfer tool.
- The OSS command tool is suitable for large file transfer.
- The FileZilla graphical client is only suitable for small file transfers.
How to install OSS commands
recommended
It is recommended that you use the format of compressed package for uploading and downloading. For a large number of small files, please make a compressed package before proceeding. upload.
The oss command line tool can upload and download files in the personal data space. It supports a variety of operating systems. Click the corresponding operating system below to download.
OSS (Windows) OSS (macOS) OSS (Linux)
Windows installation:
-
Download OSS (Windows) Click the icon to download

-
Double-click oss_windows_x86_64.exe to run the oss command.

-
Enter
versionin the pop-up CMD window to verify that the installation is successful.
MacOS installation:
-
Open the terminal that comes with MacOS

-
Enter the following download command to install
➜ ~ sudo mkdir -p /usr/local/bin ➜ ~ sudo curl -L -o /usr/local/bin/oss https://gpucloud-static-public-prod.gpushare.com/installation/oss/oss_darwin_x86_64 ➜ ~ sudo chmod u+x /usr/local/bin/oss -
Execute the
oss versioncommand to verify whether the installation is successful➜ ~ sudo oss version version:v1.2.36+prod git commit: 0759e529f692a8dbca86be24aece46c00abc577d go version go1.16.6 linux/amd64 operating system: darwin, arch: amd64 build time:2021-08-27-CST/12:01:48
Linux Installation:
-
Execute the following command in the shell window to install
[root@linux-root /]# curl -L -o /usr/local/bin/oss https://gpucloud-static-public-prod.gpushare.com/installation/oss/oss_linux_x86_64 [root@linux-root /]# chmod u+x /usr/local/bin/oss -
Execute the
oss versioncommand to verify whether the installation is successful[root@linux-root /]# oss version version:v1.2.36+prod git commit: 0759e529f692a8dbca86be24aece46c00abc577d go version go1.16.6 linux/amd64 operating system: darwin, arch: amd64 build time:2021-08-27-CST/12:01:48
How to install FileZilla graphical client
FileZilla is a multi-platform file transfer tool that allows you to upload or download files of personal data.
Transfer via FileZilla tool
- userspace.gpushare.com: 2022 The method of transferring data to personal data will be offline on 2021-12-31, currently offline.
- Data can still be transferred to the instance through the FileZilla graphical client tool.
| Storage | Hostname | Port | Username | Password | Status |
|---|---|---|---|---|---|
| Instance Data | Instance SSH Hostname | Instance SSH Port Number | root | Instance Password | Supported |
How to obtain the instance SSH host name, instance SSH port number, and instance password?
-
Open the Gpushare Cloud Console, copy the login instruction and password, and paste it into a text or editor.

-
After pasting, it will look like this:
Login command: ssh -p 6666 root@i-1.gpushare.com
Password: vKExWbBWnVkszkwaFdh4cPABADSNFGuS

The command is broken down as follows:
Instance SSH hostname: i-1.gpushare.com
Instance SSH port number: 6666
Instance username: root
Instance password: vKExWbBWnVkszkwaFdh4cPABADSNFGuS
The FileZilla tool currently only supports uploading and downloading instance data files, and supports multiple operating systems. Click the corresponding operating system below to download.
FileZilla Windows [FileZilla macOS](https://gpucloud-static-public-prod.gpushare.com/
Upload large files through OSS command tools
Reminder for uploading large files through OSS command tools:
- After double-clicking the oss program in the Windows system, the
CMDwindow will pop up, and then execute the command in the pop-up CMD window. There are oss commands in the instructions below. After double-clicking the oss program in the Windows system and jumping out of the CMD, you do not need to type oss command, just type the command after the oss command in the following steps. - The MacOS system uses the built-in terminal to operate.
- Linux can use the shell window.
1. Log in to the personal data cloud disk through OSS commands.
 View command help
 oss help

 Log in to the Gpushare cloud account, use the account name and password of Gpushare cloud, the account name is the mobile phone number
 If it is a non-mainland China mobile phone number, you need to add the area code with +
 oss login
Username: 139********
Password:**********
139******** login successfully!

 If you are a Proprietary Cloud user, you need to add the -cloud=ent parameter to log in to the Proprietary Cloud
 The format of the username is Proprietary Cloud username@enterprise ID
 ./oss login -cloud=ent
Username: username@panda
Password:**********
username@panda login successfully!

 Log out of Gpushare Cloud account, used when switching accounts
 oss logout
2. Create folder in personal data
#Create a folder named datasets in personal data
 oss mkdir oss://datasets
Create folder [oss://] successfully, request id [0000017E0091FBEC9012CBB9E0EBBCE1]
Create folder [oss://datasets/] successfully, request id [0000017E0091FC1D9012CC094BBD9AF3]
3. Upload the "personal data.zip" of the local computer to the datasets folder in the platform's personal data
oss cp personal data.zip oss://datasets/
4. View my uploaded personal data.zip
 oss ls -s -d oss://datasets/
Listing objects.
Folder list:
oss://datasets/
Object list:
oss://datasets/personaldata.zip
Folder number is: 1
File number is: 1
5. Log in to the instance to view the personal data.zip uploaded in the personal data cloud disk
For information on how to connect to an instance, see Login to a Linux instance or Login to a Windows instance documentation.
 ssh -p 53xxx root@i-1.gpushare.com
root@i-1.gpushare.com's password:
#Log in to the personal cloud disk in the instance, (for proprietary cloud users, you need to add the -cloud=ent parameter to log in to the proprietary cloud)
root@I87f7d582c00801bcf:~# oss login
Username:139xxxxxxxx
Password:**********
139xxxxxxxx login successfully!

#View the data in the personal cloud disk
root@I87f7d582c00801bcf:~# oss ls -s -d oss://datasets/
Listing objects.
Folder list:
oss://datasets/
Object list:
oss://datasets/personaldata.zip
Folder number is: 1
File number is: 1
6. After entering the /hy-tmp/ directory, download data from the personal data cloud disk to the instance
root@I87f7d582c00801bcf:/# cd /hy-tmp/
root@I87f7d582c00801bcf:/hy-tmp/# oss cp oss://datasets/personaldata.zip ./

#View downloaded data
root@I87f7d582c00801bcf:/hy-tmp# ls
personal data.zip
7. Unzip personal data
root@I87f7d582c00801bcf:/hy-tmp# unzip personal data.zip
Upload small files through the FileZilla graphical client tool
1. Open the FIleZilla graphical client Double-click to open the FileZilla graphical client
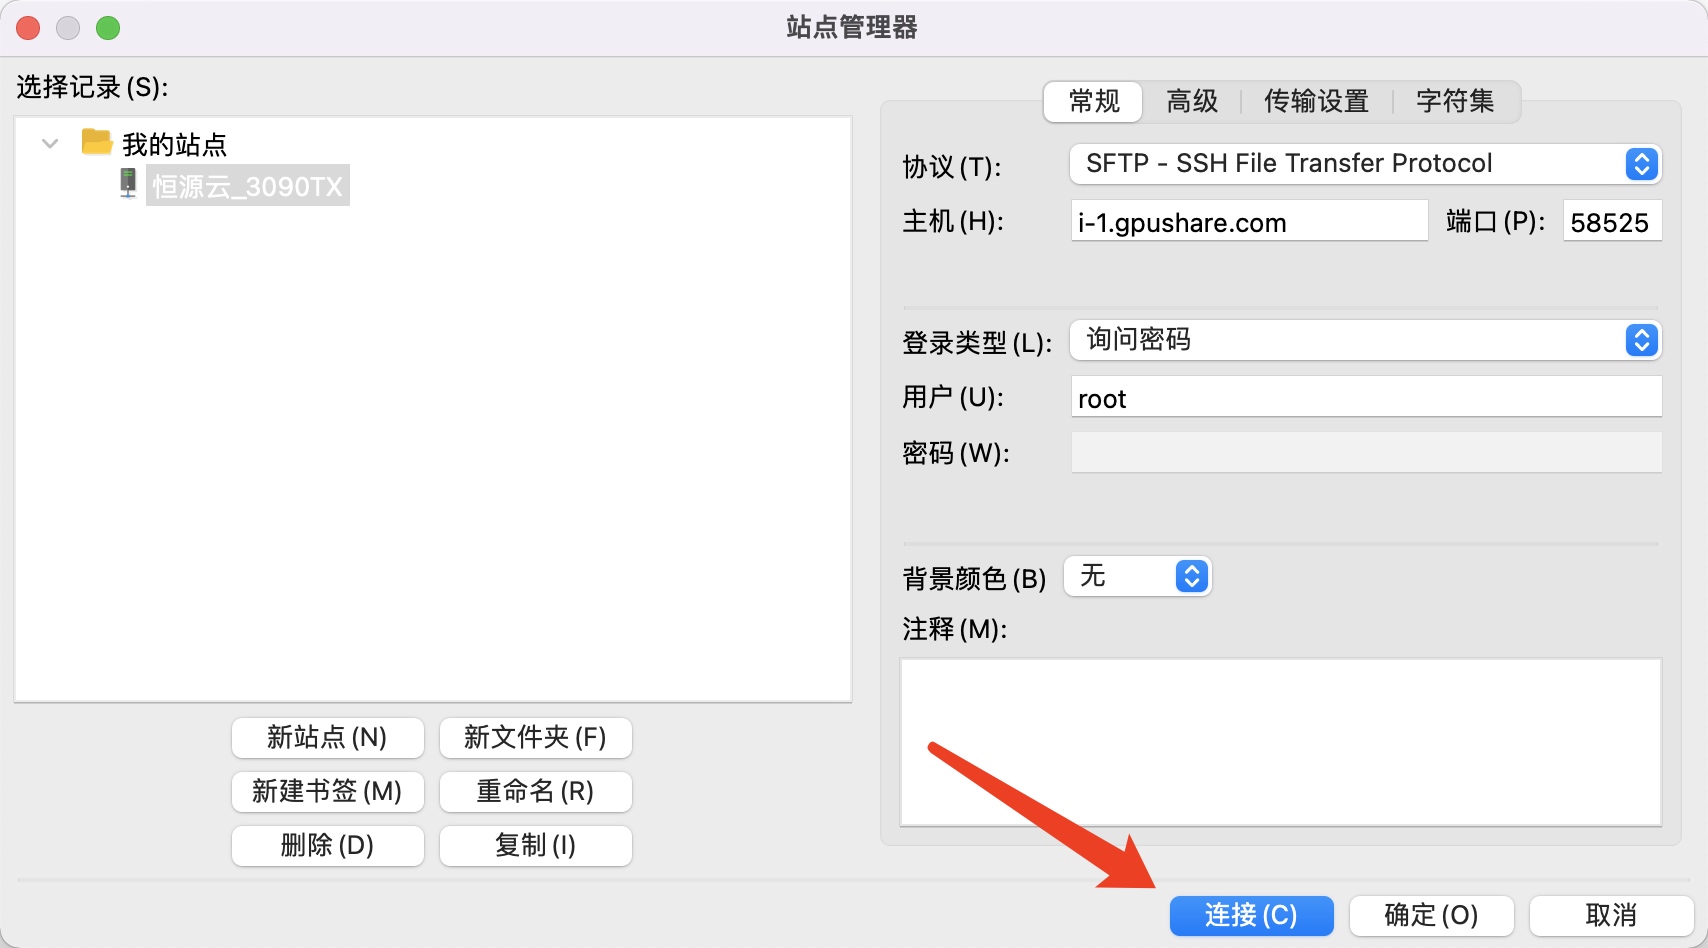
2. Click File->Site Manager

3. Click New Site - Select SFTP Protocol

4. Enter host, port, user, password
Login Type Selection: Normal
 then click connect
5. The directory in the red box is the directory in the instance, and the directory in the green box is the local directory of your computer

6. Enter the /hy-tmp directory in the instance

7. Transfer local data into the instance.

8. Log in to the instance and verify the uploaded data
For information on how to connect to an instance, see Login to a Linux instance or Login to a Windows instance documentation.
#Execute the ls /hy-tmp/ command after logging in to the instance. If the following is displayed, it means that the data my data is uploaded successfully
root@I8acdf033900201926:~# ls /hy-tmp/
personal data.zip
9. Unzip the data in the instance
#Enter /hy-tmp directory
root@I8acdf033900201926:~# cd /hy-tmp/
root@I8acdf033900201926:/hy-tmp# unzip personal data.zip
Archive: personal data.zip
   creating: personal data/
  inflating: personal data/.DS_Store
  inflating: __MACOSX/personaldata/._.DS_Store
  inflating: personal data/test.py
How to download the data in the instance to the local
Download large files through OSS command tools
1. Log in to the personal data cloud disk through OSS commands in the instance.
 View command help
 oss help

 Log in to the Gpushare cloud account, use the account name and password of Gpushare cloud, the account name is the mobile phone number
 If it is a non-mainland China mobile phone number, you need to add the area code with +
root@I87f7d582c00801bcf:~# oss login
Username: 139********
Password:**********
139******** login successfully!

 If you are a Proprietary Cloud user, you need to add the -cloud=ent parameter to log in to the Proprietary Cloud
 The format of the username is Proprietary Cloud username@enterprise ID
root@I87f7d582c00801bcf:~# ./oss login -cloud=ent
Username: username@panda
Password:**********
username@panda login successfully!

 Log out of Gpushare Cloud account, used when switching accounts
 oss logout
2. Create folder in personal data
#Create a folder named datasets in personal data
root@I87f7d582c00801bcf:~# oss mkdir oss://datasets
3. Upload the "personal data.zip" in the instance to the datasets folder in the platform's personal data
root@I87f7d582c00801bcf:~# cd /hy-tmp/
root@I87f7d582c00801bcf:~# oss cp personal data.zip oss://datasets/
4. View my uploaded personal data.zip
root@I87f7d582c00801bcf:~# oss ls -s -d oss://datasets/
Listing objects.
Folder list:
oss://datasets/
Object list:
oss://datasets/personaldata.zip
Folder number is: 1
File number is: 1
5. Log in to the personal data cloud disk through the OSS command on the personal computer
 oss login
Username:139xxxxxxxx
Password:**********
139xxxxxxxx login successfully!
6. Download the data in the personal data cloud disk to the local computer
 oss ls -s -d oss://datasets/
Listing objects.
Folder list:
oss://datasets/
Object list:
oss://datasets/personaldata.zip
Folder number is: 1
File number is: 1

#download personal data
 oss cp oss://datasets/personaldata.zip ./
Download small files via FileZilla graphical client tool
1. Connect the site through the FIleZilla client
2. Enter the instance/hy-tmp/ directory

3. Download the data in the instance /hy-tmp/ directory to the local computer
