quick start
manual:
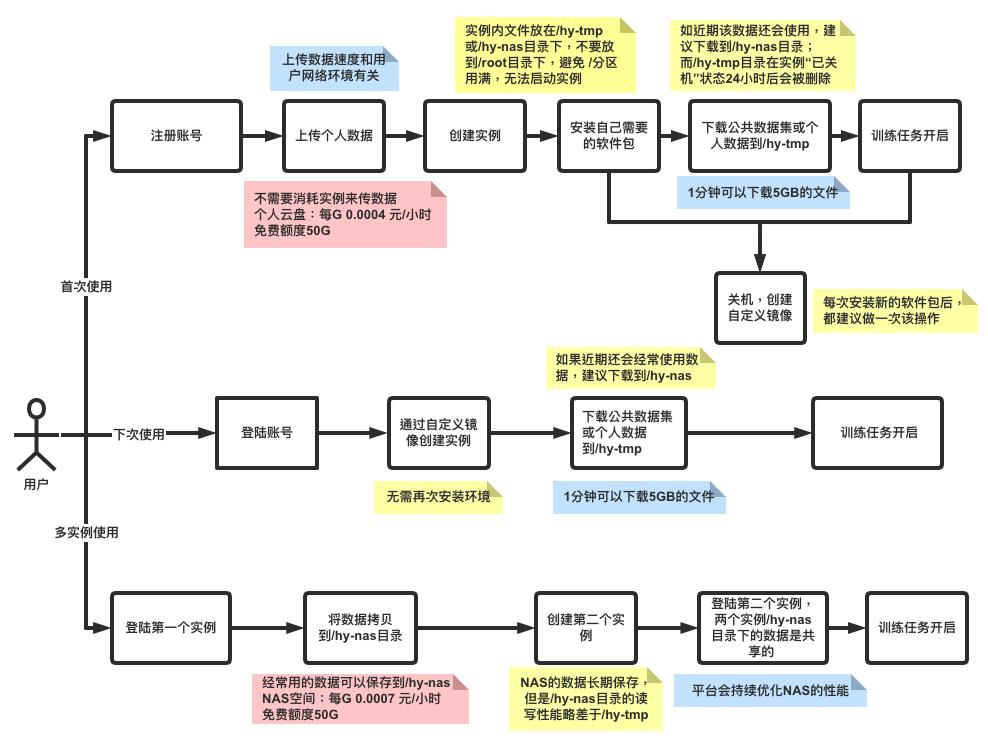
Register; Login
Enter Gpushare Cloud Register page to register with your mobile phone number.

data upload
tip
In the process of uploading data to personal space. You can perform operations before starting the instance, saving the cost of running the instance.
On the Personal Data page, you can see the files and usage of personal data.

Files can be uploaded to Personal Data via the client or the command line. It is recommended to upload or download the oss command-line tool independently developed by the platform. For the detailed usage of oss command line tool, please refer to oss command tool.
tip
Upload only supports compressed package format, you need to make the file into a compressed package before uploading.
Download the oss tool to the local computer according to the platform.
Windows users will need to rename the file to oss.exe. When using CMD, cd to the current directory and execute ./oss to use it. Or add the path of the tool to the system environment variable PATH and directly execute the oss command to use it.
Linux/macOS users need to rename the file to oss, move it to the /usr/local/bin/ directory, and execute chmod u+x /usr/local/bin/oss to grant execution permissions.
OSS (Windows) OSS (macOS) OSS (Linux)
# Log in to the Gpushare cloud account, use the account name and password of Gpushare cloud, the account name is the mobile phone number
 oss login
Username: 139********
Password:**********
139******** login successfully!

# Upload the LTR.zip file of the local current directory to the personal data root directory
 oss cp LTR.zip oss://
Upload successfully, 0B, n/a, /root/LTR.zip --> oss://LTR.zip, cost [949], status [200], request id [0000017815B1244D9010CE2D38ACDA70]

# View uploaded files
 oss ls -s -d oss://
Object list:
oss://LTR.zip
The platform also provides some common public datasets, which can be browsed in the public dataset of the console. For details, please refer to the document public dataset section.
Refer to the documentation Data Storage for the directory within a specific instance.
create instance
Filter the required host configuration in Gpushare Cloud's Cloud Market, and click Rent Now to enter the purchase interface.

On the Purchase Instance page, select the billing mode, instance configuration, and system environment image, and click Create Instance to lease.

You can see the instance you just purchased in My Instance, and you can use it after the creation is complete.
use example
After the instance is started, you can run the code or log in to the instance by copying the login instructions, or opening the JupyterLab link.

Click Terminal on JupyterLab to create a new terminal window.

Use the oss command in the terminal to download the zip you just uploaded to the personal data space.
First execute cd /hy-tmp to enter the /hy-tmp directory. Then execute the oss login command to log in to the personal data space, use the account name and password of Gpushare Cloud, and the account name is the mobile phone number.
root@I1797e5d8b00801521:~# cd /hy-tmp
root@I1797e5d8b00801521:/hy-tmp# oss login
Username: 139********
Password:**********
139******** login successfully!
Next, download the LTR.zip compressed package file you just uploaded to the instance.
# View files and folders in personal data
 oss ls -s -d oss://
Folder list:
oss://LTR.zip

# Download the LTR.zip file in the personal data to the current directory
 oss cp oss://LTR.zip .
Download successfully, 0B, n/a, oss://LTR.zip --> /hy-tmp/LTR.zip, cost [232], status [200], request id [0000017815B526D69013E5C032024691]

# The file has been downloaded in the example
root@I1797e5d8b00801521:/hy-tmp# ls
LTR.zip
At this point, the data has been transferred from the local computer to the instance, and you can start writing code for training. Tools such as IDE code editors, JupyterLab, TesnorBoard can refer to Best Practices for learning.
Account recharge
Click Cost Center in the console to enter the fee homepage, and click the Recharge button.

Select the recharge amount and payment method, and then click Recharge.
